RidingTheClutch.com

Radiant extension for searching flickr

I’ve just released an extension for Radiant CMS which lets you search flickr and returns an unordered list of the thumbnails that match. The extension is listed in the Radiant Extension Registry and is hosted on its own page on Github . Just create a directory in /vendor/extensions called something like flickr and drop the extension in there. Restart Radiant and you’re good to go!

Check out the README for usage.

First tutorials available on Sketchup for Woodworkers

Parts 1 and 2 of the getting started tutorials are now up on Sketchup for Woodworkers Check ’em out!

Launch! Sketchup for Woodworkers.com

For the past year and a half now I’ve taken up woodworking as a pretty serious hobby. I’m currently enrolled in my second woodworking class at Palomar College and a major part of the class will be designing our own project from scratch. Using Google Sketchup is an option but not many of the students know it (and I don’t envy someone using a 3D software package for the first time). I’ve been using Sketchup for a while now and wanted to share what I’ve learned with the class.

So this past weekend I hunkered down with Sketchup and Photoshop and put a site together. Sketchupforwoodworkers.com will be a resource of tutorials and more that are specifically designed for woodworkers just starting out, or ready to move to the next level, with Sketchup. Even if you’re not interested in building your own bedroom set but have always wanted to dip your toes into 3D, check it out!

Technical Details The site is powered by Radiant and hosted by the fine folks at Linode.

Build and publish your Jekyll site with one command

As I’ve mentioned recently, my blog is built with Jekyll. I put together a little script (actually just an alias since I didn’t need any logic) that builds the site and pushes it to my server. My directory structure looks like this:

["\n/rtc\n  /jekyll\n  /raw\n  /site\n"]

/jekyll is the Jekyll source, /raw contains my posts and source files for the site, /site contains the generated code that Jekyll produces.

My alias is called “rtc” and I can just type that at a prompt to build the site and rsync it with my server. Add this to your home directory’s .bash_login or .bash_profile (if you’re on a Mac, the name may be different on Linux but it’s the file that will run each time you bring up the terminal and add all of your custom paths, aliases, etc.). This should all be on one line:

["\nalias rtc=\"echo 'Building...' && ~/Sites/rtc/jekyll/bin/jekyll \n--pygments ~/Sites/rtc/raw ~/Sites/rtc/site && \necho 'Pushing...' && rsync -avz --delete ~/Sites/rtc/site/ \nuser@myserver.com:/var/www/rtc/\"\n"]

You’ll need to replace the directories and user@myserver.com of course. If you have your public ssh key on your remote server then you won’t need to provide a password each time you run this command.

When I run it here’s what I see at the terminal:

["\nBuilding...\nSuccessfully generated site in /Users/rob/Sites/rtc/site\nPushing...\nsending incremental file list\natom.xml\nindex.html\nrobots.txt\n... big long list of files ...\n\nsent 5344 bytes  received 24392 bytes  19824.00 bytes/sec\ntotal size is 5268345  speedup is 177.17\n"]

Done!

git status on your desktop

I found a neat app this evening called GeekTool for your Mac. It lets you add a few neat things to your desktop:

  1. the contents of a plain text file (like a log)
  2. the output of any command run in the terminal
  3. an image from the local drive or the web

There are a few sample desktops on the site. Here’s a really tightly integrated example.

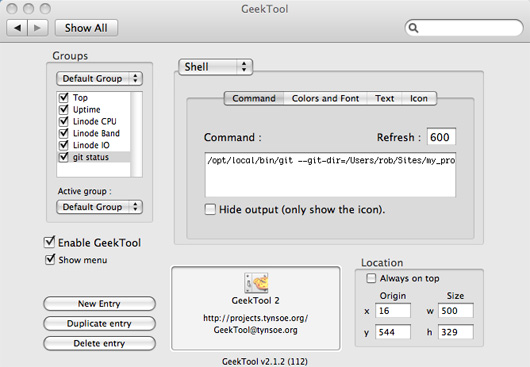
For those that use git here’s a neat way to keep an eye on the status of a directory. Add the following command as a new “shell” entry in GeekTool (all on one line):

["\n/opt/local/bin/git --git-dir=/Users/rob/Sites/my_project/.git \n--work-tree=/Users/rob/Sites/my_project status\n"]

My desktop with GeekTool

In my case I installed git via Macports so I’m using /opt/local/bin/git to call git. Do a which git and change the above script to use that location. Since GeekTool calls to the terminal from who-knows-where, we’re giving git the full path to our project. After you add the command to GeekTool hit tab to enable it and then F11 to move all your windows out of the way. You should now see the output of the command at the upper left of your desktop. You can move it, or drag the handle in the lower right corner to resize.

I changed my font size and color to make it a little more readable on my desktop. I’ve got uptime and top -l1 -u -o cpu -S, as well as cpu, bandwidth and io graphs from my Linode vps.

My desktop with GeekTool

Cache anything (easily) with Rails and memcached

Update 6/9/2010 – As philrosenstein points out in the comments below, a similar mechanism was made available in Rails 2.1 using Rails.cache. See Railscast #115 for an introduction.

When I first heard about memcached I was excited because of the promise of a very fast caching mechanism that could store anything, but was a little frightened by the idea of dipping my toes into the caching world. Isn’t caching hard? Not the actual process of storing something. Expiring from cache is a different story. I’m only going to deal with the first problem.

So, how easy is it? First, get memcached. If you’re running something like Ubuntu this is as easy as:

["\nsudo apt-get install memcached\n"]

Of if you have Macports on your Mac then:

["\nsudo port install memcached\n"]

Once you have memcache you’ll want to start it running:

["\nmemcached -vv\n"]

The -vv puts memcache in Very Verbose mode so you get to see all the action. You’ll run this as a daemon once you’re ready to go for real (replace -vv with -d).

My example below uses Ruby and Rails but there are memcache libraries for just about every language out there . For Ruby we’re using memcache-client and you’ll need the gem:

["\nsudo gem install memcache-client\n"]

Okay, all the hard stuff is out of the way. Rails already tries to require 'memcache' so you don’t need to worry about that at all. At the end of your config/environment.rb file create an instance of memcache and assign it to a constant so it’s around whenever we need it:

["\nCACHE = MemCache.new('127.0.0.1')\n"]

Now we’ll add a simple method to our application controller so that this new caching mechanism is available to all of our controllers. Make sure this method is private:

["\nprivate\ndef data_cache(key)\n  unless output = CACHE.get(key)\n    output = yield\n    CACHE.set(key, output, 1.hour)\n  end\n  return output\nend\n"]

memcache stores everything as simple key/value pairs. You either ask memcache if it has something for a given key, or give it a value along with a key to store. This method will attempt to get the value out of cache and only if it’s not found then will run the block you use when calling it (that’s next) and store the results of that block into cache with the given key and telling it to expire after 1.hour. Every time you ask for that key within the next hour you’ll get the same result from memory. After that memcache will store it again for another hour.

As a very simple example, you could use this in your controllers like so:

["\nresult = data_cache('foo') { 'Hello, world!' }\n"]

So, if the cache contains a key called ‘foo’ it will return it to result. If not, then it will store Hello, world! with the key foo and also return to result. Either way, result will end up with what you want (the contents of the block). If you take a look at the output of memcache back at the terminal you’ll see it trying to get and store data by the key.

Storing a simple string doesn’t do us much good, so let’s try a real world example. At work I’m working on a new search with a Google GSA . We get some keywords and other search parameters from the user, send them over to the GSA, parse the result, and display to the user. We only update our search index once per day, so if more than one person searches for “running san diego” there’s no reason to go to the GSA each and every time—the result hasn’t changed since it was asked for the earlier in the day. So we cache the result for 24 hours.

A search result on our system can be uniquely identified by the URL that was generated from the user’s search parameters. We use this URL as the key to memcache. A regular URL can be pretty long so we take the MD5 hash of it and use that as the key:

["\nmd5 = Digest::MD5.hexdigest(request.request_uri)\noutput = data_cache(md5) { SEARCH.search(keywords, options) }\n"]

SEARCH is the library that talks to the GSA and parses the result (which I hope to open source soon) (available here). What did this do for our response times? Our GSA box is currently located in Australia (it’s a loaner). Between the network latency of talking to the GSA and receiving and parsing the huge XML file it returns (50kb), most requests were taking 1500 to 2000 milliseconds (not including going through the regular Rails stack to get the page back to the user). With memcache in place the same results come back in 1 millisecond. One. That’s three orders of magnitude difference!

As you can see, adding memcache to your Rails app is stupidly simple and you can start benefiting from it right away. Don’t be scared of caching!

Update I updated the post to use data_cache rather than cache as that’s already the name of the fragment caching method in Rails.
Moving my iPhone to a new Macbook

I don’t know if I got lucky, but I was just able to sync my iPhone with my new Macbook Pro with no warnings whatsoever about transferring purchases or making a copy of the iPhone’s backup directory and doing a full restore. iTunes simply copied a couple of new apps I had purchased on the iPhone over to my Macbook and it said “Sync Complete.” That’s it!

I have had a couple different iPods in the past and each time I moved one to a new computer I had to wipe it out and start over. I was expecting/dreading to do the same here. The only thing I did which I hadn’t done in the past was to copy the entire ~/Music/iTunes directory from my old Macbook to the new one before connecting the iPhone. Starting up iTunes after that showed all my original playlists just as they were on the old notebook. I plugged in the iPhone and only received one notice asking if I wanted to share diagnostic information with Apple (I said yes). So this was definitely the first time this copy of iTunes had seen this iPhone, but everything worked out okay.

Site redesign and new engine

All two of my regular readers may have noticed a pretty big change on Friday—a complete redesign of the site! I went back to my typographic roots and was heavily inspired by The Elements of Typographic Style by Robert Bringhurst. Highly recommended as a great overview and history of typography and the written/printed word in general. The site looks best in Adobe Caslon Pro but you’re probably seeing it in Georgia. Not ideal, but better than Arial.

A change you probably didn’t notice was my switch from Mephisto to Jekyll as my blogging engine. Jekyll was written by my friend Tom in Ruby. It’s very different than your normal blogging engine—there’s no admin, no templates and it’s not a hosted solution. You create your posts as individual files, optionally marked up with Textile or Markdown, and point an executable at them. It takes those files, formats them and outputs your site as static html files. Upload these to your server and you’re done! Jekyll has no concept of comments (yet) so I plugged in the simple comment system by Disqus.

I’ve got a handy little script that builds the site with Jekyll and then publishes to my server via rsync, all in one short command called rtc. Add something like the following to your .bash_profile (pretend it’s all on one line). These options will make more sense once you take a look at the Jekyll readme):

["\nalias rtc=\"echo 'Building...' && ~/Sites/rtc/jekyll/bin/jekyll \\\n--pygments ~/Sites/rtc/raw ~/Sites/rtc/site && echo 'Pushing...' \\\n&& rsync -avz --delete ~/Sites/rtc/site/ rob@myserver.com:/var/www/rtc/\"\n"]

I’m still working on the design, but it’s a start.

Client Side Includes via Javascript

Lots of the little prototype and sample sites I create at work are not backed by an app server—they’re just a series of html/CSS/JS files that show, for example, how a text field should swap to an editable state when clicked on.

The problem is that I lose the benefit of including common parts of the page via something like Rails’s render method. You want to include the same header across all of your pages, but if you copy/paste that header into five different templates, then have to make one small change…you get the idea.

The other day I thought about the old server side include technology that most web servers support. I wanted to do something similar, but on the client side. I assumed that a standard Ajax call via XMLHTTPRequest wouldn’t work from the local file system (since it actually uses http to get your file) but turns out it works just fine! Found a snippet online and modified a bit:

["\nfunction include(url,id) {\n  var req = false;\n  // For Safari, Firefox, and other non-MS browsers\n  if (window.XMLHttpRequest) {\n    try {\n      req = new XMLHttpRequest();\n    } catch (e) {\n      req = false;\n    }\n  } else if (window.ActiveXObject) {\n    // For Internet Explorer on Windows\n    try {\n      req = new ActiveXObject(\"Msxml2.XMLHTTP\");\n    } catch (e) {\n      try {\n        req = new ActiveXObject(\"Microsoft.XMLHTTP\");\n      } catch (e) {\n        req = false;\n      }\n    }\n  }\n  if (req) {\n    // send out the response\n    req.open('GET', url, false); req.send(null);\n    // if the optional 'id' element is present, insert returned text into it, otherwise write to the page wherever it was called\n    document.getElementById(id) ? document.getElementById(id).innerHTML = req.responseText : document.write(req.responseText);\n  } else {\n    document.write('This browser does not support XMLHTTPRequest objects which are required for this page to work');\n  }\n}\n"]

Stick that in your <head> and then to include another file somewhere just make a call like so:

["\n<script type=\"text/javascript\">include('header.html')</script>\n"]

By default this will write the included file wherever you put the include call. If you want to target it to a specific element just pass that element’s id as a second parameter:

["\n<div id=\"header_container\"></div>\n<script type=\"text/javascript\">include('header.html','header_container')</script>\n"]

Make sure the call to include() goes after you have created the element that’s going to contain it, as above, otherwise the element won’t exist in the dom yet and nothing will happen.

Want to use Prototype to access something in an iframe?

At work I’m putting together a prototype that lets you live-preview style changes on a webpage (similar to Wufoo’s Theme Builder). I wanted to split a page and have your styles/themes in the top half and a preview of the site in the bottom half. Rather than try to recreate the entire site in a special “preview” mode I wanted to just show the actual site and use Javascript to change styles on the fly. A good ol’ iframe to the rescue!

You can target a document in an iframe and access it’s DOM assuming that both the container page and iframed page are both coming from the same domain. Otherwise you’ve got a security problem. The problem is that, by default, the awesome Prototype library can’t access anything in the iframe (at least not by using the familiar, standard Prototype syntax like $()).

After a little searching I found a code snippet someone put online in Prototype’s Google Group page and it works great! It adds the $() method to iframe Elements so they can call $() on themselves and search inside for a matching object (iframes respond to a call to the .contentWindow property [returns the file that’s loaded in the iframe] which is how this code determines what Elements on the page are iframes).

To implement simply include this code somewhere after your prototype.js include:

["\nElement.addMethods('iframe', {\ndocument: function(element) {\n  element = $(element);\n  if (element.contentWindow)\n      return element.contentWindow.document;\n  else if (element.contentDocument)\n      return element.contentDocument;\n  else\n      return null;\n},\n$: function(element, frameElement) { \n  element = $(element);\n  var frameDocument = element.document();\n  if (arguments.length > 2) {\n      for (var i = 1, frameElements = [], length = arguments.length; i < length; i++)\n          frameElements.push(element.$(arguments[i]));\n      return frameElements;\n  }\n  if (Object.isString(frameElement))\n      frameElement = frameDocument.getElementById(frameElement);\n  return frameElement || element;\n}\n});\n"]

And let’s say your page looks something like:

["\n-- index.html\n<html>\n...\n<iframe id=\"my_frame\" src=\"contents.html\" />\n...\n</html>\n\n-- contents.html\n<html>\n...\n<h1 id=\"logo\">Hello World Industries</h1>\n...\n</html>\n"]

And the usage is thusly (this goes in index.html):

["\nvar iframe = $('my_frame');\nvar the_logo = iframe.$('logo');\n"]

Now the_logo contains a standard Prototype Element for the logo inside the iframe!

Bonus Need to target the body itself?

["\nvar iframe = $('my_frame');\nvar iframe_body = iframe.document().body;\niframe_body.setStyle({backgroundColor:'#990000'});   // set the background to dark red\n"]

Wedding and Honeymoon Photos

Well, streaming the ceremony didn’t quite work. We couldn’t really get an internet connection on the beach so we had to fall back to Plan B—just get married the old fashioned way. But we did get plenty of photos!

Wedding
(These are the few taken with my iPhone during the ceremony, I’ll have the official ones from the photographer up soon.)

Honeymoon in Maui
(We took about 1,500 photos between the two of us! Don’t worry, these are just the highlights.)

Convert a MySQL database to a SQLite3 database

I wanted to convert a MySQL database to a SQLite3 database the other day. I did some searching and found a good script on the SQLite3 site . It didn’t quite work for me, but it was close (left a bunch of random MySQL “set” statements everywhere and used MySQL’s default multiple insert syntax). After some tweaking I got it to create the file without errors. Here’s my version for anyone that needs to do the same thing (requires mysqldump and perl be installed on your system):

["\n#!/bin/sh\n\nif [ \"x$1\" == \"x\" ]; then\n  echo \"Usage: $0 &lt;dbname&gt;\" \n  exit\nfi\n\nif [ -e \"$1.db\" ]; then\n  echo \"$1.db already exists.  I will overwrite it in 15 seconds if you do not press CTRL-C.\" \n  COUNT=15\n  while [ $COUNT -gt 0 ]; do\n    echo \"$COUNT\" \n    sleep 1\n    COUNT=$((COUNT - 1))\n  done\n  rm $1.db\nfi\n\n/usr/local/mysql/bin/mysqldump -u root --compact --compatible=ansi --default-character-set=binary --extended-insert=false $1 |\ngrep -v ' KEY \"' |\ngrep -v ' UNIQUE KEY \"' |\ngrep -v ' PRIMARY KEY ' |\nsed 's/^SET.*;//g' |\nsed 's/ UNSIGNED / /g' |\nsed 's/ auto_increment/ primary key autoincrement/g' |\nsed 's/ smallint([0-9]*) / integer /g' |\nsed 's/ tinyint([0-9]*) / integer /g' |\nsed 's/ int([0-9]*) / integer /g' |\nsed 's/ enum([^)]*) / varchar(255) /g' |\nsed 's/ on update [^,]*//g' |\nsed \"s/\\\\\\'/''/g\" |                                                                                    # convert MySQL escaped apostrophes to SQLite   \\' =&gt; ''\nsed 's/\\\\\\\"/\"/g' |                                                                                    # convert escaped double quotes into regular quotes\nsed 's/\\\\\\n/\\n/g' |\nsed 's/\\\\r//g' |\nperl -e 'local $/;$_=&lt;&gt;;s/,\\n\\)/\\n\\)/gs;print \"begin;\\n\";print;print \"commit;\\n\"' |\nperl -pe '\nif (/^(INSERT.+?)\\(/) {\n  $a=$1;\n  s/\\\\'\\''/'\\'\\''/g;\n  s/\\\\n/\\n/g;\n  s/\\),\\(/\\);\\n$a\\(/g;\n}\n' &gt; $1.sql\ncat $1.sql | sqlite3 $1.sqlite3 &gt; $1.err\nERRORS=`cat $1.err | wc -l`\nif [ $ERRORS == 0 ]; then\n  echo \"Conversion completed without error. Output file: $1.sqlite3\" \n  rm $1.sql\n  rm $1.err\nelse\n  echo \"There were errors during conversion.  Please review $1.err and $1.sql for details.\" \nfi\n"]

Update, 11/3/08 Updated the script above. Fixed a couple issues with newlines and lowercasing everything also lowercased the actual values in the tables! For some reason I had convinced myself it was only lowercasing the table and column names… There is still an issue where apostrophes are turned into weird characters, seemingly UTF-8. This might just be a simple matter of telling mysqldump to use latin instead of utf-8 encoding? I haven’t played around with it, but if anyone figures it out please let me know.

I'm getting married today!

Yep, I’m getting married today! Aimee DePietro is my bride and we’re in love. We first met in January of last year (thanks Match.com!) and things just keep getting better and better.

We’re going to try and stream the wedding from the beach at 5:30pm pacific time. If you want to come and watch live on UStream.tv

If there’s no wi-fi (the beach is fairly close to the hotel) then we have a backup plan. My best man (Tom Werner of github fame) has an aircard for his laptop and we’ll use that instead. Not sure how great the quality will be, but better than nothing!

Wish us luck!

Aimee and Rob

What did I work on this week? A script for Adobe Bridge

At my job I have a regular Friday review of everything I’ve worked on for the past week. Friday afternoon I print out a couple copies of all my Photoshop comps and meet with the bigwigs.

Adobe Bridge is a very quick way to preview images, view metadata, add keywords, etc. Bridge has the concept of a “collection” which is basically a smart filter. You do a find, filter the images you want to see, then save that filter for use later. Last Friday I created a filter to show me all the Photoshop files that had been modified on or after that Monday. Perfect—this is exactly what I worked on this week. But what happens next Friday? I need to delete the existing collection and recreate it. Seems like there should be an easier way…

Bridge saves the collection as a file in whatever directory you’d like. I opened that file in a text editor in the hopes it was just a simple list of plain text attributes. I was in luck:

["\n<?xml version='1.0' encoding='UTF-8' standalone='yes' ?>\n<collection version='200' target='bridge%3Afs%3Afile%3A%2F%2F%2FUsers%2Frob%2FDocuments%2FWork' specification='version%3D2%26conjunction%3Dand%26field1%3Dmimetype%26op1%3Dequals%26value1%3Dapplication%2Fphotoshop%26field2%3Ddatemodified%26op2%3DgreaterThanOrEqual%26value2%3D2008-09-08%26scope1%3Drecursive%26scope2%3DincludeNonIndexed'></collection>\n"]

Just a simple xml doc that lists the filters, awesome! Now just replace the date and I’m good to go. Sounds like a job for cron cron will periodically run a task and do “something” on your system. In my case I want to recreate that xml every Monday morning, setting the date to that day, and saving back to the collection file. A little research and here’s how to output the date in the format this xml file needs:

["\ndate +%Y-%m-%d\n"]

Now I just need a script file that puts that date into the xml and writes the result out to a text file. That looks like:

["\n#!/bin/bash\necho \"<?xml version='1.0' encoding='UTF-8' standalone='yes' ?>\\\n<collection version='200' target='bridge%3Afs%3Afile%3A%2F%2F%2FUsers%2Frob%2FDocuments%2FWork' specification='version%3D2%26conjunction%3Dand%26field1%3Dmimetype%26op1%3Dequals%26value1%3Dapplication%2Fphotoshop%26field2%3Ddatemodified%26op2%3DgreaterThanOrEqual%26value2%3D$(date +%Y-%m-%d)%26scope1%3Drecursive%26scope2%3DincludeNonIndexed'></collection>\" > /Users/rob/Documents/Work/This\\ Week.collection\n"]

The first line tells the system to run this in the bash shell. The second line takes the text and writes it to the terminal. Note that the date command near the end is surrounded with $() so that it runs inline and returns the result. The very end of that line looks like this:

["\n> /Users/rob/Documents/Work/This\\ Week.collection\n"]

This takes the string that was just output to the terminal and puts it into a file named “This Week.collection” in the same directory as the rest of my comps (overwriting any file with the same name). I save the script in my home directory.

The last step is to run this script every Monday. I add a new line to my crontab:

["\n30    12    *    *    1    rob    /Users/rob/bridge_collection.sh\n"]

This says to run the script I just created at 12:30, every Monday of the week. I’m running it in the middle of the day to make sure that I’m here and the computer isn’t sleeping. Done! Now I can keep track of everything I’ve worked on during the week with one click in Bridge.

Weird ruby error - undefined method 'require_gem'

Really just posting this for future Googling of this error. (Just jump to the last two paragraphs if all you care about is my solution and not any of these symptoms.)

I was working on a new app (more on that soon) and getting ready to push to my production server. When I tried to load the database schema to get it ready I got the following error:

["\n/usr/local/bin/rake:17: undefined method `require_gem' for main:Object (NoMethodError)\n"]

I figured that deep inside the massive stack of what whatever files rake was including there was some esoteric error, probably dude to different gem versions. The production server had an older version of gem so I updated that. No go. Checked the rake gem and both production and development had the same version (0.8.1). Searched online and there were other people listing this error, but no solution that helped me.

This morning I figured I would just manually create the database and see if the app worked, and it did. Not ideal, but it worked. Now came them time to start the application (two instances of mongrel balanced by Apache) and damn it, the same error! Only this time it was in the mongrel_rails executable:

["\n/usr/local/bin/mongrel_rails:17: undefined method `require_gem' for main:Object (NoMethodError)\n"]

What the hell?? So I looked at the mongrel_rails executable:

["\n#!/usr/local/bin/ruby\n#\n# This file was generated by RubyGems.\n#\n# The application 'mongrel' is installed as part of a gem, and\n# this file is here to facilitate running it. \n#\n\nrequire 'rubygems'\nversion = \"&gt; 0\" \nif ARGV.size &gt; 0 &#38;&#38; ARGV[0][0]==95 &#38;&#38; ARGV[0][-1]==95\n  if Gem::Version.correct?(ARGV[0][1..-2])\n    version = ARGV[0][1..-2] \n    ARGV.shift\n  end\nend\nrequire_gem 'mongrel', version\nload 'mongrel_rails' \n"]

Sure enough, line 17 has the require_gem method call. What does that same file look like on development?

["\n#!/usr/local/bin/ruby\n#\n# This file was generated by RubyGems.\n#\n# The application 'mongrel' is installed as part of a gem, and\n# this file is here to facilitate running it.\n#\n\nrequire 'rubygems'\n\nversion = \"&gt;= 0\" \n\nif ARGV.first =~ /^_(.*)_$/ and Gem::Version.correct? $1 then\n  version = $1\n  ARGV.shift\nend\n\ngem 'mongrel', version\nload 'mongrel_rails'\n"]

Pretty different. Checked on mongrel versions and the production server had an older one (1.0.1 versus 1.1.4). So I sudo gem update mongrel and I’m back in business—my app loads. But I still couldn’t rake my database to life…

I go back and look at the source of /usr/local/bin/rake and sure enough it’s different on my dev machine and production (pretty much the same differences as the mongrel_rails script). But rake is already up-to-date…what gives? Maybe there’s some secret gem command to update the script for rake, but I don’t know it. I just copied the rake executable from dev to production and everything was perfect! rake db:schema:load RAILS_ENV=production ran like a charm.

No idea why these scripts changed (maybe when rubygems 1.0 was released?) and why there was no process to update these scripts that depended on them…if anyone knows, please leave a comment and share!

Launch! Alfred - A Rails app for monitoring other Rails apps

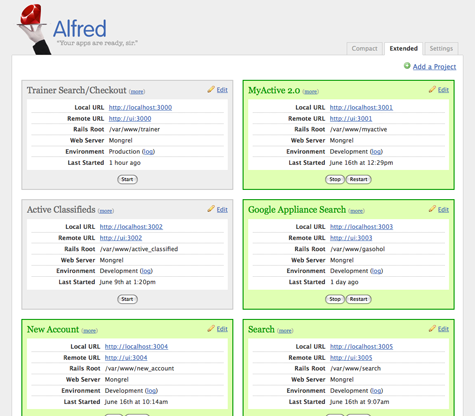
I finally made Alfred official! In my current position as UI Architect I’m always putting together little HTML or dynamic prototypes and mockups. For me the quickest way to do this has been with Rails. As I started getting three, four, five apps that I needed to keep running in order for others in the company to play with, I found that starting and stopping these apps (and keep tracking of which port they were running on, whether they were already running, etc.) got to be a huge chore.

So I wrote on more Rails app called Alfred. Alfred (named after Batman’s faithful butler) watches over your Rails apps, let’s you know if they’re running or not, and gives you one central place to start, restart and stop them. It’s been very handy at work and I couldn’t live without it now.

Alfred screenshot

It still needs quite a bit of work (it has no idea what to do in the case of an error with your app or how to gracefully recover from it) but that’s coming soon enough! I also plan on adding a public view so that you can give out the link to others if they want to check out one of your prototypes, but don’t want them having access to start/stop, new project creation, etc.

Head over to github and check out the README for instructions on getting a copy and installing. Since this is an open source project everyone out there is welcome to contribute and improve with features that they themselves find handy.

Are WE Big Brother?

I was thinking about social networking today. You know, that whole revolution that’s taking place on the internet right now which lets you see what all of your friends are doing at any given moment?

Is it possible that, like Skynet, we were so worried about the government becoming Big Brother that we didn’t notice we were creating him ourselves? And that we’re willingly giving up our privacy to him?

Plea to Firefox extension community - Please build an IDE!

I’m begging the community—could someone build a simple IDE on top of Mozilla? I’m talking just a big text editor window, access to the filesystem and code-coloring. That’s all I need. I do everything else in Firefox already (how did we ever program for the web before Firebug?) and if I could just switch tabs to write the actual code, I would be in HEAVEN.

Right now I’m using TextMate on my Mac, which I love, but there aren’t any features in there that I use that couldn’t be duplicated in this barebones Mozilla/Firefox IDE. I’d even define the syntax for the code coloring myself if it was extensible enough to do so (it would have to be to support all the languages that people would want to use this for). Out the box I would want HTML, CSS, Javascript and Ruby/Rails. I will happily build the lexicons for those syntaxes, someone just give me the format they want them in! Might I suggest TextMate’s highly customizable Bundles as a potential drop-in?

I don’t care about refactoring, automated builds or even code hinting. Files and colors are all I need (although being able to define a Project would be a nice-to-have). I’ve looked into Mozilla development and it’s just going to take too much of an investment in time to get ramped up to the point that I could actually begin to write something useful, so I’m begging someone out there who already knows what they’re doing to help me out! I’d even pay for the damn thing!

Anyone?

Backpack API CFC

Did some searching and found the old Backpack API CFC that people have been asking for! I created this several years ago as 37signals was linking to various implementations and language helpers for their API. I haven’t tried this thing since and I don’t even know if it still works, but here it is (also available under ‘Projects’ at the right).

Life and Death (or Win One for the Reaper) - Sheet Music from the Lost Soundtrack

Lost is my favorite show on tv right now. I finally got around to purchasing the soundtrack this weekend and I’m glad I did. Perfect recordings of some of the best music from the show. You almost don’t notice it when you’re watching, you just feel what you’re supposed to feel. The best example of this for me was the finale of season 1 after they blow open the hatch. We flash back to everyone getting on the plane. Everyone is moving towards their seats, giving a polite smile or nod to strangers—others they’ll end up sharing the island with. We know what’s going to happen to them in the next few hours and the music playing (a variation on the song mentioned below) starts to play…very sad moment, even though you know they’re going to be “okay.”

One of the best songs from the show is The Sad One (usually played when someone dies) entitled Life and Death on the soundtrack. There’s actually another version, Win One for the Reaper that I like better—no strings in the background (although there is a little guitar) and it feels like a finished song. Life and Death sort of fades out and then up come the discordant strings letting you know that something is wrong, usually right before a commercial. Win One for the Reaper is very clean and has a distinct end to the song. It even ends a little high note, just a bit of hope there at the very end. Beautiful song.

I don’t really play the piano. Well, not in the normal sense. I can learn a song note by note and then sit down and play it from memory, but I can’t read music to save my life (not while playing, anyway). Nevertheless I searched for the sheet music online, either to download or purchase but there was nothing. There was a torrent of the sheet music a while ago, apparently, but it doesn’t seem to be available anymore. Google returned a few results for some YouTube videos. After going through a couple of those I found one that shows step-by-step how to play the song. Bingo! Now all I needed was a piano…

I purchased my Macbook last year and one of the first things I did was uninstall GarageBand. When I installed Leopard I decided to keep it this time and even spent a few minutes playing around to see what I could do. It sat unused for months until this weekend when I realized I could use it as my piano. There’s a neat mode that lets you use the keyboard to simulate the piano keys and works surprisingly well. I also played with the default piano sound to get much softer than default (turned down the velocity to about 23 and the release up to about 1 second). I started recording, tweaked things here and there and then ended up with what I thought sounded like a pretty good version of the real thing. I also repeatedly listened to the real thing to fill in some gaps in the YouTube videos (several subtleties that it took me dozens of listenings to sound out for myself).

Now I wanted to share with everyone else who might have been searching for the sheet music just like me. I had no idea if this would work, but I went up to File > Print… and sure enough, I’ve got the sheet music! So, attached below is a PDF of the sheet music for Win One for the Reaper by Michael Giacchino (it has my name on the sheet simply because my name is in the computer, sorry Michael!). With a little modification this is also Life and Death. Listen to the soundtrack and you’ll be able to figure out the differences. Enjoy!

Win One for the Reaper / Life and Death – Lost Soundtrack (pdf)

Update Here’s an MP3 straight out of Garageband of myself playing the song. Had to tweak the default Grand Piano to make it softer and not nearly as bright:

Win One for the Reaper (mp3)

A dilemma

Lately I’ve been bouncing between two extremes at work: wanting to Make a Difference and just Collecting a Paycheck. There are times at my job where I really want to fight for something, a design or a new feature, and sometimes I win—Making a Difference. Other times I realize it’s not worth the fight and so I give up—Collecting a Paycheck. Making a difference is great for the soul, but is it worth the aggravation and stress that comes along with it? Sitting back and collecting a paycheck is easy and carefree, but will I feel empty years later when I look back at what I’ve done with my life?

When I’m collecting a paycheck I feel like my free time is more important, and that I’ve got my priorities right. Or what the general consensus would say are the right priorities—family and friends first, work second. One of my favorite quotes: “On their deathbed, no one ever said ‘I wish I’d spent more time at the office.’” But do I want to look back and see that 33%+ of my life was spent just doing what I was told, not what I believed in?

When I’m making a difference I feel alive—the code flows out of my fingers and the day flies by. I don’t mind working late to just finish up this one feature. I’m at home, thinking of little tweaks and updates. This is when family and friends start to move down the totem pole a little. Being at home becomes a distraction from what I should be doing. Is that any way to live a life?

There are times at work when I feel—when I know—that my opinion doesn’t matter to the decision makers and that things are just going to be a certain way , no matter how clear it might be to everyone else that we’re moving in the wrong direction. At these times trying to Make a Difference just leads to disappointment—you can’t win. The boss wants it a certain way, and that’s just how it’s going to be. That when it’s time to go into paycheck mode. Just do what you’re told , the boss will be happy (the customers, they’re a different story).

I feel like someone who just collects a paycheck isn’t the guy who becomes CEO of the company one day. But do I want to be that guy? Do I want even more stress and responsibility for things that, in the long run, really don’t matter? Or do I just enjoy my small victories when I can get them, do a good job from 9 to 5 and then come home and Make a Difference with the people that really matter?

Welcome to HD

I finally crossed the threshold into High-Def. I’d been holding back for quite a while, what with HD DVD vs. Blu-ray, 1080i vs. 1080p, LCD vs. plasma vs. DLP… the list goes on. After much research I finally found a TV I knew I’d be happy with for a few years, the Samsung LN-T4661 . Glowing reviews from professionals and home users as well. I’ve gone through and did a quick once-over calibration with the new HD DVD version of Digital Video Essentials and it looks amazing. I can’t stress this enough: do not just plug in your TV and leave it like that forever. Get this disc or something similar and tweak those settings. From the factory most TVs are set to look good in a showroom and that means maximum brightness and overly saturated colors, which ruins the fine details in your favorite TV show or movie.

I knew that normal TV programming wouldn’t keep me satiated very long so I also picked up a Toshiba HD-A20 HD DVD player, capable of 1080p output. Although depending on who you ask, it might not be true 1080p. But, the next step up in players is their top-of-the-line HD-XA2 model which costs twice as much. I think I’ll wait for a firmware update for mine, or pick up a Samsung BD-UP5000 dual format player when it arrives in October.

Now for images. In a word: stunning. When you have a great set showing some great content (check out the Planet Earth series), it’s hard to believe that images from a television can look this good. There’s a scene in Planet Earth where the camera zooms out and you see litterally thousands of birds on the screen at once. Each is perfectly clear and identifiable.If you don’t plan on upgrading from standard definition any time soon, do yourself a favor and don’t go out of your way to find a setup like this. Ignorance is bliss! I can’t imagine going back to standard def now. I watched a couple scenes from King Kong in HD last night and I don’t remember it looking half this good in the theater. The colors are so rich, everything pops off the screen. You can make out individual flies buzzing around the T-Rex as it wakes up next to Naomi Watts in the jungle.

And maybe it’s just all in my head, but the sound seems that much better as well. HD discs are supposed to have more bandwidth for sound, so it should be better. I’ve got a Denon AVR-3805 receiver talking to 7.1 Infinity Primus speakers, and had this same setup even before the new TV. Sound was good before but it feels like a true home theater now. There’s a point in King Kong where he stomps off past the camera and you can hear him walking off to the side and eventually behind you, staying easily localized the whole time.

If you’re on the fence about HD, just go ahead and take the plunge, you won’t be disappointed. I’m not aware of any big changes to the specifications on the horizon so you should remain future-proof for some time. If you haven’t see a good setup yet, make it a point to go and find one. It will definitely push you over the edge.

What about Rubyweaver?

Thanks to Google Analytics I’ve found that plenty of people have been coming here looking for the old RubyWeaver extension. Thanks to Jason Gill, it has a new home:

RubyWeaver

I also added a link in the side nav and the 404 page, so hopefully people can find it. Sorry about that! TextMate is my editor of choice now, I haven’t touched Dreamweaver in ages.